Splyt On-Demand Widget Overview
Version 1.0.0 (01/01/2020)
Contents
- Introduction
- Features
- Components
- Quick Start Guide
- Next Steps
- Integration Processes
- Security Considerations
- Frequently Asked Questions
- Support
1. Introduction
The Splyt On-Demand Widget is a mobile SDK that has been designed as an out-of-the-box alternative to integrating directly with the Splyt Consumer API. This allows you to quickly integrate and release a global on-demand booking interface in your iOS / Android mobile applications. This manual introduces the On-Demand Widget and provides a quick-start guide to integrating the mobile SDK, so you can experience the Widget booking user interface on our Sandbox environment.
If this is the first time you have heard about the Splyt On-Demand Widget, please get in touch with us at widget@splytech.io to arrange a demonstration.
2. Features
- Out-of-the-box booking UI ready to be integrated into your iOS / Android mobile app!
- Low impact mobile SDK - does not add large map related dependencies to your project.
- Integrate with your existing user-base.
- Integrate with your existing in-app payment methods, wallet or loyalty points scheme so you can charge your user's for bookings.
- Compare providers, car types and price/pickup time estimates.
- Create on-demand bookings in global operating areas covered by the Splyt Mobility Marketplace.
- Track your booking, from finding the driver all the way through to being dropped off at your destination.
- View your booking history.
3. Components
| Mobile SDK | WebHook Integration Service | |
|---|---|---|
| Platform(s) | iOS / Android | REST API |
| Requirements | iOS 11+ / Android 5.0+ (API 21) | HTTP server with TLS |
| Provided By | Splyt | Built by you |
| Description | Mobile SDKs that provide the On-Demand booking user interface and functionality, you will integrate this into your iOS / Android mobile applications. | A WebHook server that you build so we can authenticate your user's with our On-Demand widget service. Widget will also use your service for retrieving user data and handling payments. For the Quick Start Guide, we will enable a mocked WebHook Service by default for you to experience the On-Demand Widget before you commit to building this service! |
| Documentation | iOS / Android | WebHook Integration Service |
4. Quick Start Guide
The following steps will guide you through a basic integration and explain how to try out the booking interface through a completion-case booking on our Sandbox environment. There is not a requirement to have implemented the WebHook Integration Service at this point.
-
First, you need to obtain your
partner_idfrom the Splyt Widget team. You will initially be given a value that can only be used on the Sandbox environment while you integrate the SDK into your application.You must have a pre-existing relationship with Splyt in order to request your
partner_id. Please contact us at widget@splytech.io to find out more! -
Follow the mobile SDK integration steps for the relevant mobile platform (as listed in Components) to install, configure and launch the widget SDK.
-
Use the
partner_idprovided, and ensure that the Sandbox configuration option is set totruein the configuration object used to initialise the Widget mobile SDK. -
Build and run your mobile application. When you present the widget, a screen will be launched that shows a map as well as a white box at the top of the screen that asks for the pickup/drop-off addresses for the booking. If you receive an error message or a blank screen, please follow the Troubleshooting guide.
-
You can now try to create a simulated booking on our Sandbox environment. Press on the pickup/drop-off fields and select a pickup/dropoff address.
You can use the Simulator tool to manually simulate status transitions for the booking you just created.
-
After selecting the pickup/drop-off address, you should see simulated driver icons the pickup point. Press the next button at the bottom of the screen, you will be taken to the booking options screen, which shows an overview of the route.
-
You can select a car type (and provider), as well as the payment method. The list of payment methods displayed are returned by the mocked webhook service.
-
You can now create a booking by pressing "Book ride". A simulated driver will automatically be assigned after a short while, and the booking will automatically be transitioned through all states every ~1 minute (en-route, arrived, on-board and completed).
-
Once the booking is completed, the final fare will be displayed and you will be returned to the booking screen.
5. Next Steps
There are a number of tasks that need to be completed before you can launch your on-demand booking product with the Widget SDK.
5.1. Complete the mobile widget SDK integration
-
Ensure you have followed the mobile SDK integration steps for the relevant mobile platform as listed in Components to install, configure and launch the widget SDK for each platform you are integrating.
-
Ensure that you are passing through required fields in the configuration and ride parameters, including:
- Your
partner_idvalue. 2, TheuserIdof the user, which can be used for to identify the user in your CWIS integration. - The ISO-4217 currency code that you wish to use to receive estimate and booking fare amounts in for this user.
- A default location coordinate to display when the widget SDK is opened, in case the user does not have the location permission enabled.
- Your
-
Ensure you implement the widget delegate interface and all required methods. You must invoke the access token callback with the user's token for the authentication process to work correctly.
-
If your application does not already ask for location permissions, you can configure the widget SDK to do this on your behalf by enabling the documented configuration flag, and ensuring your project is set-up correctly to request permissions as per the OS' instructions.
-
You should make sure that widget is easily accessible to re-open in case your user has an active booking and closes the widget or your application. For example, you could re-open the widget on re-launch of your application, or show a "red dot indicator" on your bookings icon.
The mobile widget SDK provides a utility method to check and retrieve the user's active booking.
5.2. Build your WebHook Integration Service
-
You should first read the WebHook Integration Service documentation guide.
-
You should also understand the Integration Processes and Security Considerations.
-
Build, test & deploy a pre-production WebHook Integration Service that adheres to the specification in the integration guide.
-
Provide Splyt with the base URL for your pre-production WebHook Integration Service, this will be configured to be used on our Sandbox environment. The URL will have the endpoint version/name appended to it (e.g.
${base_url}/v1/login).You may be asked to update the
partner_idin your mobile SDK integration at this point. -
You can now test the E2E flow through the widget SDK using our Sandbox environment, ensuring that you correctly handle all of the WebHook Integration Service endpoints in order to authenticate and charge your user's.
5.3. Migrate to Production
-
Request a production
partner_idvalue from the Splyt Widget team and update it in your mobile SDK integration(s) for release builds.Splyt may request a build of your mobile application to conduct a review of the integration before issuing a production
partner_idvalue. -
Remove the Sandbox configuration flag from the configuration object used to initialise your mobile SDK integration(s).
-
Provide Splyt the base URL for your production WebHook Integration Service to be enabled on our Production environment.
-
Conduct E2E testing through the widget SDK, ensuring that you correctly handle production requests made to your WebHook integration Service for user authentication and charging your user's.
Splyt can arrange local beta testing of your application in a region of your choice. Please contact Support to discuss & arrange testing options.
-
Release your mobile application(s) with the widget SDK integration, as per your usual staged rollout schedule.
6. Integration Processes
The widget SDK relies on a number of integration processes between your and Splyt's systems. Please review the following section in detail to ensure a complete operational integration can be achieved.
6.1. User Authentication
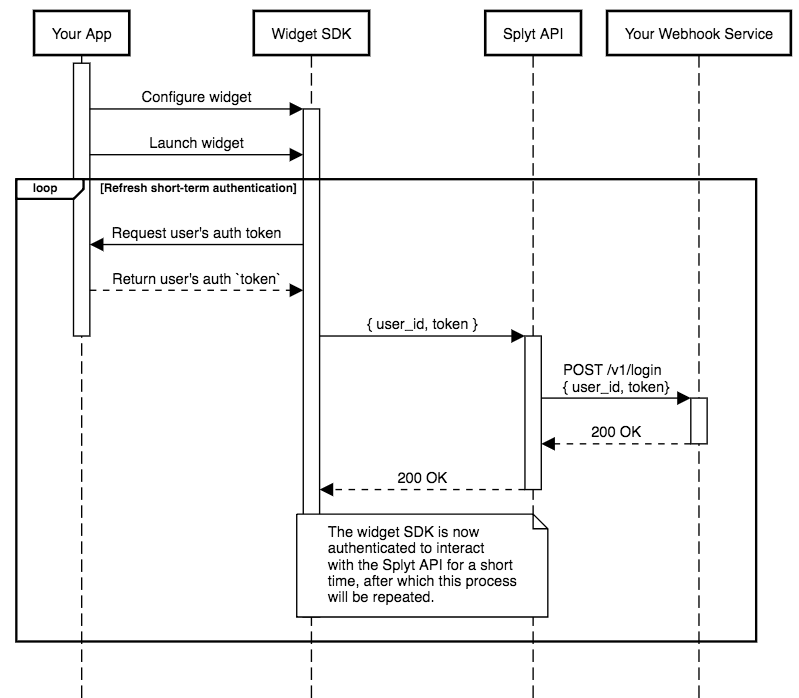
This process is used to authenticate one of your user's with the Splyt API in order to interact with the widget SDK. We will use a short-lived access token to create bookings on behalf of the user that you authenticate. Your responsibilities in this process are:
- Provide the Widget SDK with a single-use token (specific to a user) when requested. This may be requested multiple times within a session.
- The same token will be provided to you through the backend-to-backend integration between Splyt and your Webhook Integration Service. You must verify that the token is valid for the given user.
6.2. Payments
You are responsible for returning your user's payment methods, as well as handling the payment processes. The payment method could be a card, wallet or loyalty points scheme.
The Webhook Integration Service guide has more information about the endpoints that need to be implemented for this process.
-
After a user requests a booking through the widget SDK, a
POST /v1/payments/pre-authrequest is made to your Webhook Integration service. By returning a 200 response from this endpoint, you confirm that you've held the supplied amount against the payment method. 2. If the request is successful a booking will be created with the selected provider on behalf of the user. 3. If the request fails a booking will not be created, and an error will be displayed to the user stating that the payment method could not be used. -
After a booking has completed, a
POST /v1/payments/pre-auth/capturerequest will be made to your WebHook Integration Service to inform you that the user should be charged the given amount for their booking.A booking could also be chargeable if canceled or if the passenger does not show for the driver, depending on the rules of the provider. A capture WebHook request will also be made in these cases.
We also offer support for Stripe cards, please contact us to find out more about this option.
6.3. Support
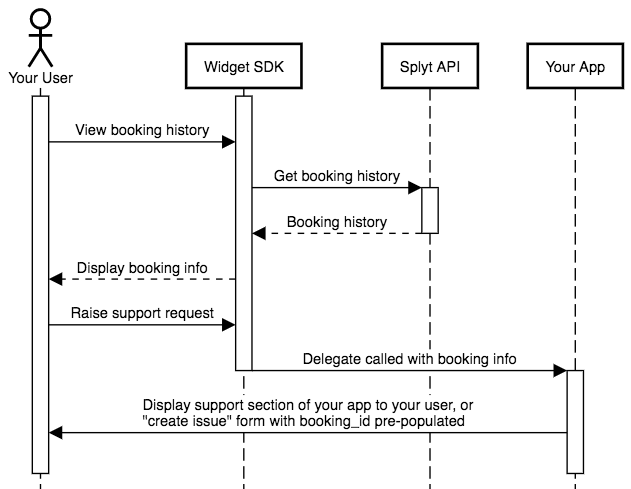
The support process facilitates your user to raise a support request for a specific booking that they have made. The widget SDK displays a list of historic bookings to the user. When the user has selected a booking to view more detail, they can request to raise a support issue. At this point the widget SDK will callback to your application through the registered delegate to inform you of this event, along with an object that contains booking information. Your app can, for example, use this information to pre-fill a support request form. At request, Splyt can also enable a live support chat service for you user's. Please contact us to find out more information.
6.4. Push Notifications
Push notifications are very important for keeping your user's informed as to the status of their booking.
We do not implement the user subscription to notifications, or the sending of them. However, when a booking is transitioning, we will call your CWIS with a POST /v1/notification request. The request will include a full formatted/translated title/body. If you choose, you can send your user a push notification with this information.
7. Security Considerations
7.1. User Authentication
- The token used for authenticating user's should be single-use and only apply to a single user from your system.
- You are responsible for generating/obtaining this token using a pre-existing authorised communication channel with your backend. (e.g. your mobile application API).
- Authentication is short-lived, the widget SDK will request a new token from your application every ~30 minutes of active use.
7.2. Payment Methods
- Payment method details will never be shared or transmitted. The widget SDK relies on a unique payment method identifier that you provide when configuring the available payment methods. This identifier should allow only you to identify a payment method in the context of a specific user.
7.3. WebHooks
- Your WebHook Integration Service must support HTTPS. All network requests must be made with TLS/SSL.
- You can provide a set of headers that will be included in all WebHook requests (such as
authorizationheaders). - You need to set up a HMAC authentication header to guarantee the integrity of WebHook requests made to your Integration Service. A shared-secret value will be generated and provided to you, which you must keep private and secure on your backend. You should use this secret to regenerate and compare with the HMAC header in each request. Requests that fail this check should be rejected and reported immediately.
8. Frequently Asked Questions
-
Is it possible to provide API access to all bookings that our user's have made through the Splyt On-Demand Widget API?
Yes this is possible, please contact us and we will arrange API access to your user's bookings through the Splyt Consumer API.
-
How are sessions handled by the widget SDK?
A short-term session is managed internally between the widget SDK and the Splyt API. A session is created for a user using the token returned by your application when requested by the widget SDK, this token is then submitted to the Splyt API and verified by a request made to your WebHook Integration Service. If authenticated, this session is then used to allow your user create bookings through the widget SDK.
9. Support
Please contact us with any questions or to arrange a demonstration.